Short Description
Design your own bioimage analysis workflow, graphically, and automate it on many images (batch processing).
No programming knowledge required! Protocols can be shared and re-used straight from the Icy website.
Watch this 30 minutes introduction to protocols during the NEUBIAS Academy @home webinar (go directly to 29:18 to skip the general introduction to Icy) and see the corresponding slides (whole webinar or protocol part only).
Documentation
The plugin Protocols provide a graphical environment that enables anyone to create graphically and without any prior knowledge in programming a bioimage analysis workflow, and automate it on many images (batch processing).
Available protocols
To get you quickly started and inspired, you can browse the online collection of Icy protocols or search directly through the Icy software search bar with your favorite keywords.
How to design a protocol
- Add blocks to your protocol, either by right-clicking inside the workspace and navigating through the various categories, or by using the keyword-based search in the left-hand side panel. Each block represents an elementary image processing or quantification task. Most plugins in Icy have their block counterpart. If you notice a plugin that is not available as a block, you are very welcome to submit a comment on the page of the plugin you wish to use and ask for it.
- Link blocks together by dragging arrows (on the edge of each block) from block to block. By doing so, the blocks will automatically communicate and transfer their results between one another and run sequentially.

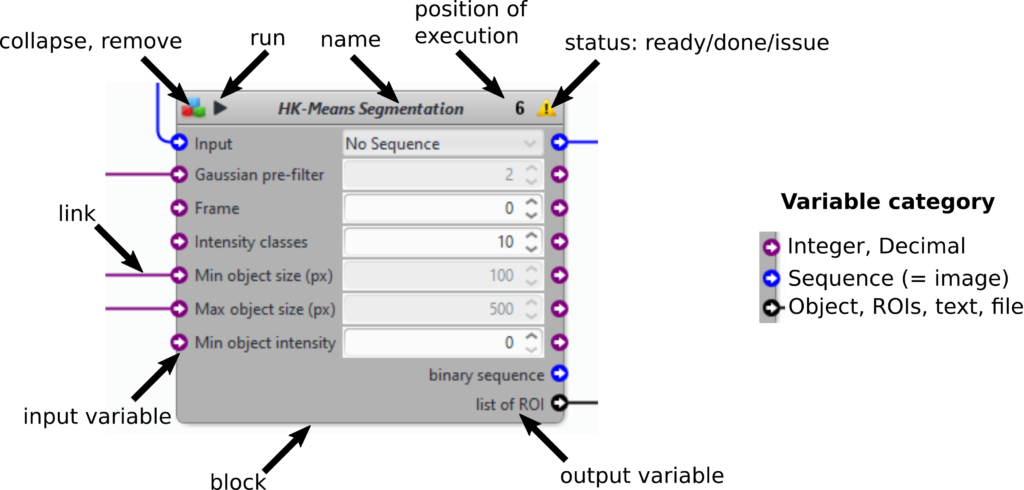
- Run the full protocol by clicking on the top play button. Run some blocks only by clicking on the play button of the block (see block description above). The protocol will be run till this block.
A protocol and all its parameters can be saved at any time (in XML format) by clicking on “save” and reloaded from a local repository by clicking on “Load”.
We encourage users to add their finished protocols to the Icy website for immediate sharing and/or perma-linking in a scientific publication. Indeed, protocols published on the Icy website can be downloaded directly from the Icy software. Any user can hence re-run a given protocol using the original parameters, and further edit the workflow by adjusting parameters, adding or removing blocks. To share a protocol on the Icy website, you need to create an account first, then log in your account, go to the dashboard and click on “Protocols -> Add New”.
How to organize large protocols
A protocol can quickly have a large number of blocks and managing screen space is then critical. We gather here a few useful tips:
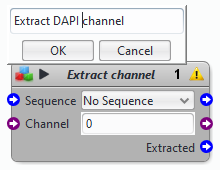
- rename your blocks to convey more information

- collapse most of the blocks (see the block description above)
- rearrange blocks or group of blocks in the space (ctrl+click to select one or more blocks)
- embed blocks belonging to the same step or “component”, for instance “segmentation”, using workflow blocks. Add a workflow block to your protocol, select all the blocks you would like to embed with ctrl+click, cut them with ctrl+X and paste them inside the workflow block with a left click in the workflow block and then ctrl+V. In the end, expose the variables that need to be connected to outside of the workflow block (right click on the variable). Note that only real inputs and outputs can be exposed. Variables that are just “transferred” from one block to the other cannot be exposed.
How to do batch processing
You can run a given protocol on a large number of images automatically (a process many users refer to as “batch mode“).
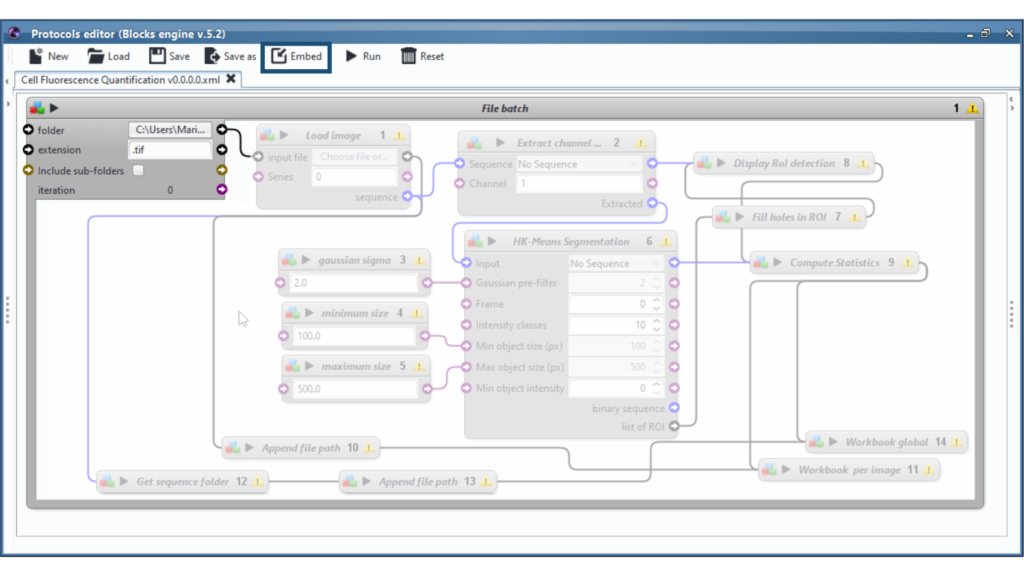
Create and test your protocol on a single image. Then click on “embed” in the Protocols editor menu. This option embeds the current protocol in a batch type block.
There is many batch type blocks. File batch process sequentially all files in a given folder. Sequence file batch process sequentially all sequences (images) in a given folder. Etc.

On the screenshot above, one of the batch parameter is the folder to process. To the right of this parameter, there is a black arrow that will read and provide, one after the other, all of the files available inside the specified folder, ready to be processed by the inner blocks. Connect this arrow to the entry point of our embeded protocol, here the “input file” of the first inner block “Load image”.
When clicking on the “Play” button, the enclosing block will import the first file, run the inner protocol, then move on to the second file of the folder, run the protocol again, and so forth.
Note that some inner block parameters may have to be adjusted after embedding. For instance, in a workbook to file, the “if file exists” option can be set to “merge sheets, excluding first row” in order to gather all results from all images into a single spreadsheet.
How to run a protocol from the command-line
Protocols can also be run from the command-line.The key point here is to pass arguments from the command-line to the various input blocks of the protocol.
To do this, we have to give an ID to each block whose input or output variable we want to modify via the command-line. Note that only a few blocks can receive an ID. They are listed in the “Read” section of the contextual menu (right click -> Read section). You may need to add additionnal blocks to your protocol to make it work from the command line. To set the ID, click on the block’s menu (the upper-left-hand icon), and write for instance “input1”, as in the video above.
To launch the protocol from the command line, the video above uses a command similar to this one:
icy.sh -hl -x plugins.adufour.protocols.Protocols protocol=/my/great.protocol input1=/my/inputFile
Let’s briefly analyse this line:
- icy.sh is the Icy startup command (NB: replace by icy.exe on windows; you can also generically use “java -jar icy.jar” instead)
- -hl is short for “headless”, which means icy will run on the command line and no graphical interface will appear
- -x tells icy to run a specific plugin at startup (this plugin is “Protocols”, as you might have guessed)
- protocol=… indicates the path to the protocol file to run
- input1=… is used to pass a parameter to the protocol (in the video, a path to a folder to process), using the ID created above. There can be as many IDs here as parameters needed: input1=…, input2=…, input3=…, output1=…
You can now run Icy with your favorite protocol on any Java-friendly machine (desktop, server, cluster, smart fridge, etc.).
Acknowledgements
Contributors to this project include:
- Ludovic Laborde (copy/pasting, dis-embedding, search bar, block renaming)
- Stephane Dallongeville (for stress-testing, troubleshooting and continous support, one update at a time)
- All of the happy (and patient) alpha/beta/gamma testers and feature requesters out there!
9 reviews on “Protocols”