This tutorial explains how to set up your development environment and create a new Icy plugin using Maven.
It will guide you through the following steps:
- Setting up your development environment
- Importing the plugin template from GitLab
- Modifying the pom.xml file to fit your plugin description / requirements
- Building the project
- Testing
- Examples and documentation
- Deploy the project (optional)
- Publish the plugin
Note that we are using Eclipse IDE for this tutorial. Feel free to you to use another IDE if you are already familiar with it but note that you will have to find by yourself how to do the equivalent operations on this other IDE.
Setting up your development environment
To develop your own plugin for Icy, you first need to setup your development tools. Follow our instructions to set up your development environment prior to continuing with this tutorial. If you’re not familiar with Maven, please read this introduction to Maven. We will base the development of the Icy plugin in a Maven project.
Importing the plugin template from GitLab
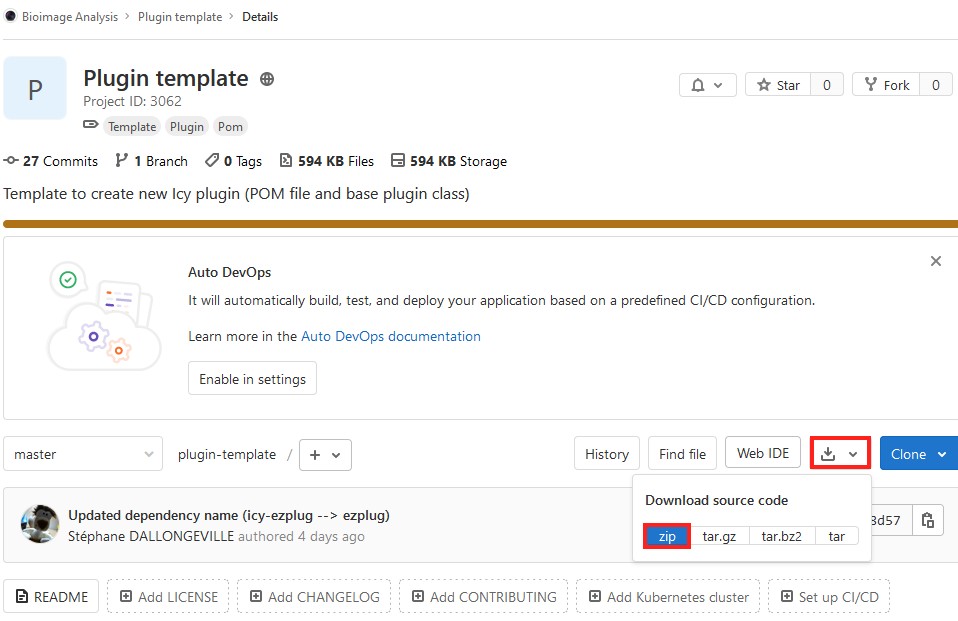
We created a plugin template that you can directly re-use to create your own plugin for Icy. If you have a GitHub or GitLab account, you can directly clone the project. Otherwise, you need to download the plugin template from its GitLab repository (use a Google or Github account to log in).
- Click on the download button then choose your archive format (zip preferred)

- Unpack the obtained archive (plugin-template-master.zip) in your development folder (probably your IDE workspace folder). Rename the folder to reflect your plugin project name. If everything went correctly, you should see the following files in your project folder
 Now you need to import this project as a Maven project into your IDE of choice !
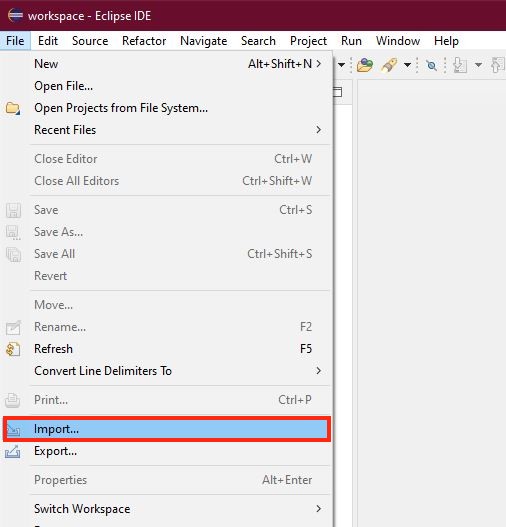
Here’s how to do it with Eclipse: - Select File –> Import

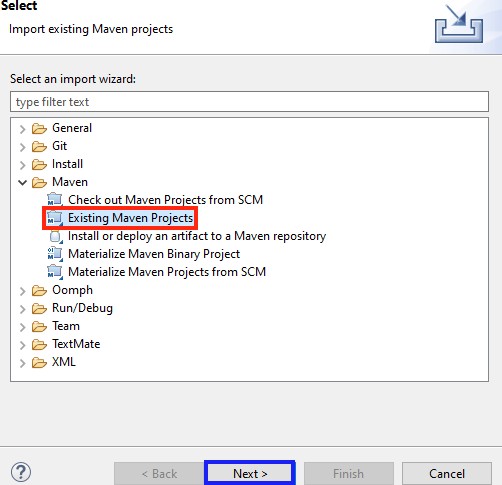
- Then choose Existing Maven Projects

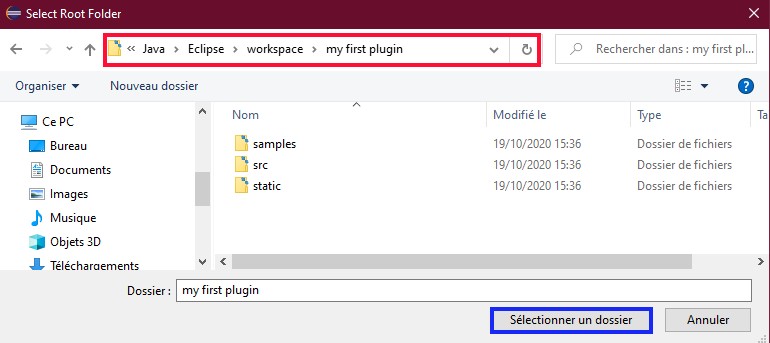
- Click on Browse…

- Select the folder where the project is located then click on Select a folder

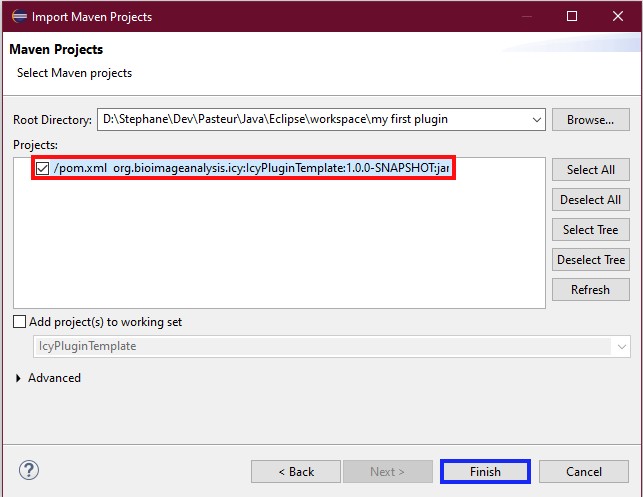
- It should find the Maven project (the name may differ a bit depending the version).
Click on Finish to validate the operation
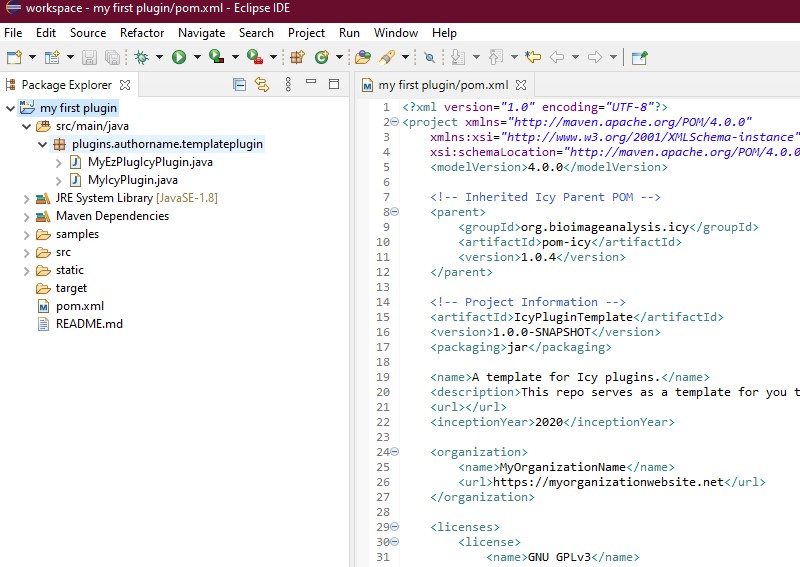
- If everything went right you should now see the project imported in Eclipse (you may see some slight differences in the POM file).

At this point the plugin template project is correctly imported and ready to be modified or tested.
Modifying the pom.xml file to fit your plugin description / requirements
Please read this short introduction to Maven before reading this section if not already done.
To modify the pom.xml file, you can either follow the minimal instructions from the template of the Readme file or the detailed instructions below:
Artifact
Maven uses rules about the name of the groupId, the artifactId and the version number to identify your project (which will become an artifact) and to prevent conflicts with other dependencies (which are also artifacts).
These are the first elements you need to change (from the project information, not from the parent block):
-
- The groupId corresponds to your institution where you are working. Most of the time, we use the inverse web domain but the main rule is to have a name in lower-case with a dot between each word.
For instance with Icy we use org.bioimageanalysis.icy - The artifactId is kind of similar to your project name. It must be in lower-case with a dash between each word.
- The version number follows the principle of Major.Minor.Patch . Add -SNAPSHOT keyword if your project is not ready for a release (internally Maven will replace it by a timestamp to make it unique).
- The groupId corresponds to your institution where you are working. Most of the time, we use the inverse web domain but the main rule is to have a name in lower-case with a dot between each word.
General information
Others fields you should change for information purpose:
-
- name : name of the project
- description: a brief summary on what is your project
- url: link to a page concerning your project
- inceptionYear: year the project started
- organization: information about your institution
- licenses: !!warning!! the license you choose must not be more restrictive than the licence of Icy which is under the GNU GPLv3 license.
- developers: list of people who developed the plugin and their role associated.
Dependencies
One of the main purpose of the POM file is to manage the project’s dependencies. For that you have to fill the dependencies section with the required artifacts. In the template, we already setup 2 dependencies:
-
- Icy kernel (contains all the application core, GUI, tools, etc…)
- EzPlug library (used to easily build plugin UI)
You will probably need to add more dependencies. To do so, you can search for artifacts on the Central Maven repository which registers the majority of available artifacts. If you are looking for an Icy plugin, you can also search on our Maven Nexus repository. Then, to add an artifact as dependency:
-
- Go to the page of your selected artifact
- Choose your version number
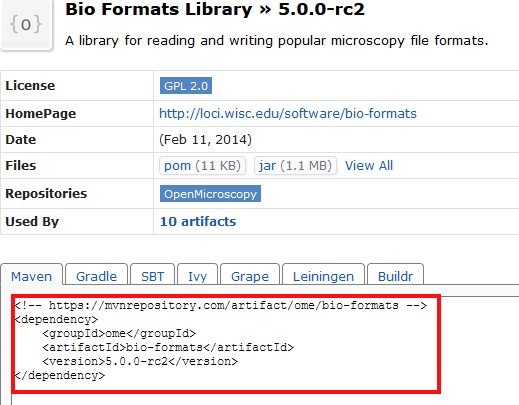
Copy and paste the Maven artifact block description into the block dependencies of your POM file.
For instance here with the bio-formats 5.0.0-rc2 artifact:
We also need to specify where to find the dependency (the repository hosting it). By default the template reference points to the Icy Maven Nexus repository, which also internally reference the Central Maven repository but sometimes you can see a little note under the dependency block saying that the artifact is hosted on a third-party repository server:

In this case, you must add the repository on which the artifact is hosted to the repositories section:

Tips: if you want to simplify the management of your version dependencies, you can create a variable in the block properties and calling it in the version block of your dependency.
Building the project
The advantage of having the parent POM is that you do not need to provide the instructions to create your package. We did everything for you to easily generate the three JAR files:
- The JAR containing your compiled project (project-version.jar)
This is the JAR file that you will use in Icy and that you will publish. - The javadoc JAR containing all the code documentation you made (project-version-javadoc.jar),
- The source JAR containing the source files of the project (project-version-sources.jar)
We also defined several profiles to separate Maven tasks (building, deploying for dev, deploying for release..).
The default profile is called compile-project. This is the one you will almost always use to build and generate the project JAR package.
Build from IDE
Note that we do not really recommend to use Maven from Eclipse as we noticed some weird behaviors compared to using Maven directly from the command line (added JRE JARs in dependencies, unexpected errors in POM file parsing..)
-
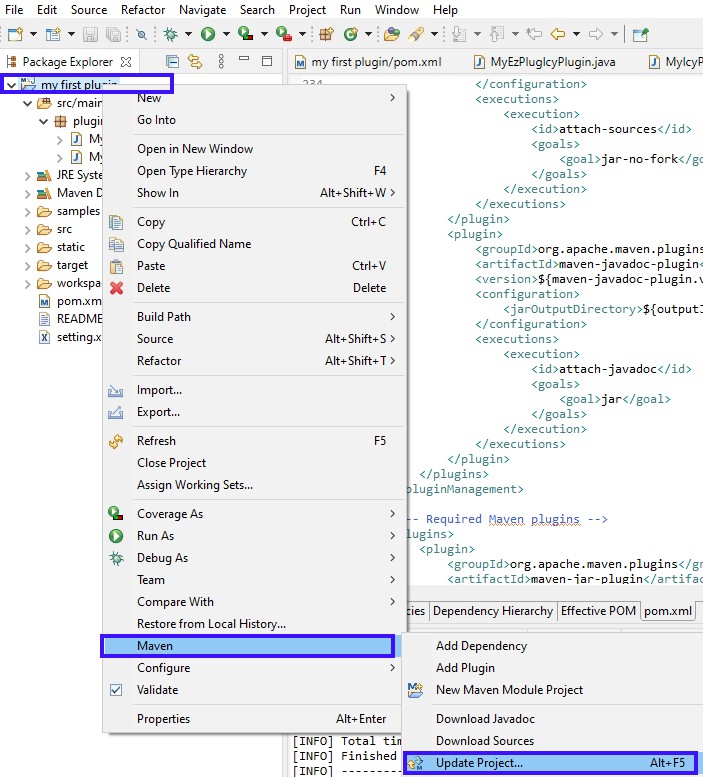
- First be sure that the project is correctly up to date with the POM description file.
Right click on your project root folder then select Maven –> Update Project…

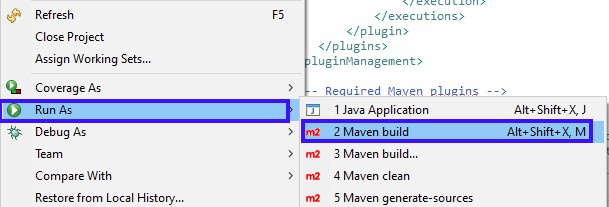
- When this is done, execute the Maven build process.
Again right click on your project root folder then select Run As –> Maven build

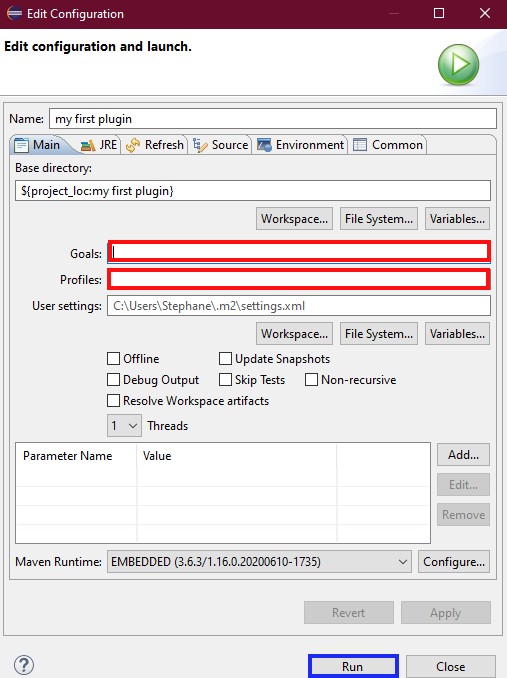
- You normally need to select which Maven goal or profile to execute but as we have defined a default profile you can leave these fields blank and just click on Run to execute it.

- If everything went right, you should BUILD SUCCESS logs in the Eclipse Console:

- First be sure that the project is correctly up to date with the POM description file.
Build from command line
-
- Go to your project root folder.
- Simply execute the following command:
mvn - After some seconds you should see the same BUILD SUCCESS log as above
As you can see building from command line is even easier than doing it from the IDE, it’s why we recommend to use Maven from command line.
Testing
Now that you can compile your project, what we want to do is to test your plugin to be sure it’s working as expected. The most straightforward way of doing that is what you will find in the plugin template: we added a main(..) entry point in the plugin class so we can quickly execute it as standalone app. Internally that will launch Icy application then start the plugin.
Here is the example from MyIcyPlugin.java:
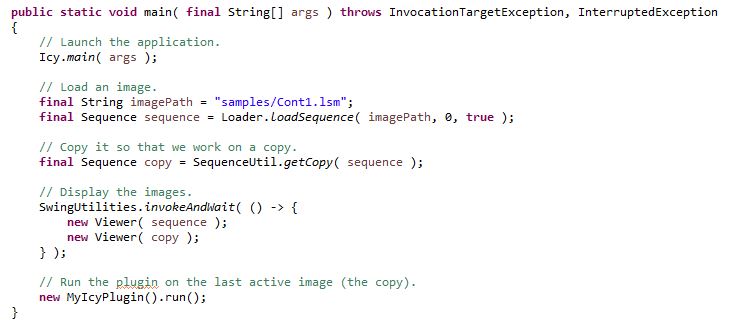
This also offers the advantage of preparing necessary data to test the plugin as you can see here.
Examples and documentation
The template includes two examples:

- MyIcyPlugin.java: A simple plugin example, that modify an image with no UI
- MyEzPlugIcyPlugin: A second example plugin that uses EzPlug to build a basic UI for a plugin
Use one or the other as base depending your needs then you can read the training material about how to build an Icy plugin to understand the Icy Data Model and the API.
Package conventions in Icy
By convention the Java package of Icy plugins takes the following form: plugins.authorname.pluginname
- plugins: it is mandatory that your plugin package name starts with plugins (otherwise Icy won’t recognize it).
- authorname: it should be a condensed version of your name.
For instance the author Alexandre Dufour uses adufour, Jean-Yves Tinevez uses tinevez and so on… - pluginname: it should be a condensed name of the plugin you are currently developing, and it should be unique among all the plugins you develop to avoir package name clashes within the Icy application. Note that you can also add sub package name to categorize your classes / plugin if you want.
For instance the classes of the demo you will find in this template repository are in the package plugins.authorname.templateplugin. Obviously you need to customize the authorname.templateplugin part for your plugin.
Deploying (optional)
As Maven offers a good environment for developing a project, it can be restrictive for the good of the project. So if you want to others developers to use your project as a dependency, you must upload your artifact to a Maven repository.
- Check if your institution has one. For people working at Pasteur Institute, send us an email to get an account on our Maven server.
- If you can not get any access to a Maven server, GitLab offers that service for free by going on your repository Packages & Registries > Package Registry section. For people who are using a GitLab company instance, if you do not see the tab, check in your repository settings General > Visibility, project features, permissions if the option is enabled and if it is not the case, ask to your IT support team to resolve the problem (a full tutorial is available here)
Publish your plugin
When you have tested your plugin and are satisfied with it, maybe it’s time to publish it on Icy website and make it available for everyone ! You can follow instructions from our dedicated article for that: How to publish a plugin.
 Now you need to import this project as a Maven project into your IDE of choice !