The EzPlug library is meant to help developers write plug-ins fast and efficiently, i.e. focusing on the major aspect of the work (“the main code”) and leaving aside tedious aspects such as GUI design for parameter input and threading issues. Here, we will guide you through the use of EzPlug to develop your own Icy plugins.
As a plugin developer, you could also be interested by:
- our article on Maven
- how to set your development environment
- how to create a new Icy plugin from scratch
- how to migrate your old Icy plugins to Maven
How works EzPlug?
By using some methods, EzPlug lets developers create nice-looking plug-ins, without any necessary knowledge in GUI programming. These methods allow to declare a number of parameters of various types (booleans, numbers, enumerations, arrays, etc.), each of which embarks a ready-to-use GUI component that automatically shows up in the interface at run-time. The main execution code runs in a background thread (no more nasty GUI hangs). Other convenience methods allow the developer to support a “stop” button (that automatically appears on the interface if supported), as well as the built-in functionality to save/load parameters to/from an xml file on disk.
A fully working example can be found on Gitlab. This template is ready to use.
You just have to select your MyEzPlugIcyPlugin as your main class (it is possible to rename it of course) and delete MyIcyPlugin as we need EzPlug to create a plugin with GUI.
Technical documentation
General
The plugin is fully compatible with Maven to manage dependencies and create the JAR file that Icy uses to run the plugin. If you want more details about it, please check our Maven tutorial.
The main class of a EzPlug plugin must extend the EzPlug abstract class which itself extends from the Plugin abstract class that creates a runnable plugin for Icy.

Code example :
public class MyEzPlugIcyPlugin extends EzPlug {
     @Override
     public void initialize() {
          // Creation of the interface
     }

     @Override
     public void execute() {
          // Do some tasks
     }

     @Override
     public void clean() {
          // Clean things when closing the plugin
     }
}
As it extends an abstract class, you must implements these methods :
- initialize : Add components to show by order of appearance with addEzComponent(component) function,
- clean : By default, there is nothing but you can use it if you need to clear some data,
- execute : Runs a program when data are retrieved from the inputs.
Also, do not forget the main function if you want to test your plugin.
GUI (Graphical User Interface)
EzPlug gives you a lot of components that you can use to show without needing to write them. There are interface components that is useful to organize your windows and components that the user can interact with or use it to show information.
How to use it ?
public class MyEzPlugIcyPlugin extends EzPlug {
     private final EzVarInteger integerInput = new EzVarInteger("label", default int value, min, max, step);

     @Override
     public void initialize() {
         addEzComponent(integerInput);
         addEzComponent(new EzLabel("Test"));
     }

     @Override
     public void execute() {
         // Do some tasks
     }

     @Override
     public void clean() {
        // Clean things when closing the plugin
     }
}
Create a class attribute with the component type of your choice, fill it with the necessary information and then use the addComponent in the initialize function to make it visible in your plugin window !
It is also possible to initialize the component directly inside the addEzComponent method.

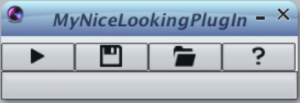
Without any component initialized, your plugin will look like this by default; a row of four buttons : execute, load, save and online documentation with a progress bar underneath.
Components
Here is a non exhaustive list of available components :
- EzButton: render a button
- EzLabel: render a text
- EzVar: input components
- EzVarBoolean: render a checkbox that is corresponding to a boolean state
- EzVarInteger: render an input of type int
- EzVarDouble: render an input of type double
- EzVarFloat: render an input of type float
- EzVarFile: render an input with the browse file button
- EzVarSequence: render a comb box to select a sequence
- EzVarSlice: render a combo box to select a slice from a sequence
- EzVarText: render an input of type string
Examples
- Buttons and labels
public class MyEzPlugIcyPlugin extends EzPlug {
     private final ActionListener actionListener = new ActionListener() {
         @Override
         public void actionPeformed(ActionEvent e) {
             new ActionFrame("Ouch!");
         }
     };
     private final EzButton tap = new EzButton("Hit me", actionListener);

     @Override
     public void initialize() {
         addEzComponent(new EzLabel("Boring text"));
         addEzComponent(tap);
     }

     @Override
     public void execute() {
         // Do some tasks
     }

     @Override
     public void clean() {
         // Clean things when closing the plugin
     }
}

What does this code?
It renders a text with a button where there is a listener on the click event which it will render an ActionFrame with a message.
- Input and boolean
public class MyEzPlugIcyPlugin extends EzPlug {
    private final EzVarBoolean isLiking = new EzVarBoolean("Like chocolate ?", true);
    private final EzVarInteger age = new EzVarInteger("Your age", 30, 10, 100, 1);

    @Override
    public void initialize() {
        addEzComponent(isLiking);
        addEzComponent(age);
    }

    @Override
    public void execute() {
        // Do some tasks
    }

    @Override
    public void clean() {
       // Clean things when closing the plugin
    }
}

What does this code?
It renders a boolean input which is true by default and an interger input where the default value is 30 and it must be between 10 and 100 with a stepper sets to 1.
- Custom Combo box
public class MyEzPlugIcyPlugin extends EzPlug {
    private enum Choice {
          Yes, No, Perhaps
    }
    private final EzVarEnum<Choice> choices = new EzVarEnum<>("Choice", Choice.values(), Choice.Perhaps);

    @Override
    public void initialize() {
        addEzComponent(new EzLabel("Boring text"));
        addEzComponent(tap);
    }

    @Override
    public void execute() {
        // Do some tasks
    }

    @Override
    public void clean() {
       // Clean things when closing the plugin
    }
}

What does this code?
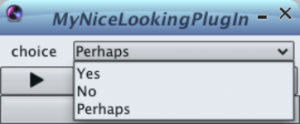
It renders a custom combo box based on an enum created just before. It has as a default selected value “Perhaps” and the selection contains all values from the enum.
Advanced components
If you need to organize your components or need to have a complexier window, there is also some EzPlug compenents available.
Here is a non exhaustive list of those components available :
- EzGroup: render a foldable group of components,
- EzDialog: render a dialog,
- EzTabs: render some tabs to order your components by category,
- EzPanel: render a container for components,
Example
public class MyEzPlugIcyPlugin extends EzPlug {
    private final EzVarBoolean b1 = new EzVarBooelan("Test #1", false);
    private final EzVarBoolean b2 = new EzVarBoolean("Test #2", true);
    private final EzVarBoolean b3 = new EzVarBoolean("Test #3", false);

    private final EzGroup group = new EzGroup("My group", b1, b2);

    @Override
    public void initialize() {
        addEzComponent(group);
        addEzComponent(b3);
    }

    @Override
    public void execute() {
        // Do some tasks
    }

    @Override
    public void clean() {
        // Clean things when closing the plugin
    }
}

What does this code?
It renders a group where there is two boolean inputs inside it and a boolean input just underneath. It is possible to give to the group as much as components you want inside.
Process
To use the start button in the main row, you must implement a new class : EzStoppable.
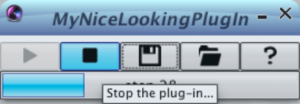
This class manage the start and stop button as well as the progress bar. That is where the execute function is useful.
When the user has set everything and the start button has been clicked, you can do all the treaments you need within that function.
Examples
- The simple implementation
public class MyEzPlugIcyPlugin extends EzPlug implement EzStoppable {
    @Override
    public void initialize() {
        // Creation of the interface
    }

    @Override
    public void execute() {
        Thread t = Thread.currentThread();

        for(int i = 1; i <= 100; i++) {

            // Do your stuff

            if(t.isInterrupted())
               break;
        }
    }

    @Override
    public void clean() {
        // Clean things when closing the plugin
    }
}

What does this code?
When the user has clicked on start, the execute method runs, gets the current thread, executes the loop except if the user stops manually.
- The complete implementation to get a real control
public class MyEzPlugIcyPlugin extends EzPlug implement EzStoppable {
    private boolean stopFlag;

    @Override
    public void initialize() {
        // Creation of the interface
    }

    @Override
    public void stopExecution() {
        stopFlag = true;
    }

    @Override
    public void execute() {
       stopFlag = false;

       for(int i = 1; i <= 100; i++) {

           // Do your stuff

           if(stopFlag)
              break;
       }
    }

    @Override
    public void clean() {
        // Clean things when closing the plugin
    }
}

What does this code?
When the user has clicked on start, the execute method runs, initialize the stopFlag variable to false to let the process running, executes the loop except if the user stops manually.
By using the stopFlag variable, you can have multiple conditions to stop the running process.
EzPlug and Protocols
The plugin Protocols provide a graphical environment that enables anyone to create graphically and without any prior knowledge in programming a bioimage analysis workflow, and automate it on many images (batch processing). You can find information on Protocols for end-user on the documentation page of Protocols and developer-oriented explanations in this tutorial on how to write your own protocol block.
As Protocols is very similar to EzPlug except they not have the same goal, you can easily convert your EzPlug plugin to a Protocol block.
The difference is in the decleration of the input and output. Instead of directly give the variable of the compoment or initialize the component, you must add the function getVariable().
Example
public class MyEzPlugIcyPlugin extends EzPlug implement Block{
    // EzPlug components
    private final EzVarInteger age = new EzVarInteger("Age", 30, 10, 100, 1);
    private final EzVarText name = new EzVarText();
    private final EzLabel ageOutput = new EzLabel("Age in 10 years");

    // Protocols components
    private final VarInteger out = new VarInteger("Out", 0);

    @Override
    public void declareInput(VarList inputMap) {
        inputMap.add(age.getVariable());
        inputMap.add(name.getVariable());
    }

    @Override
    public void declareOutput(VarList outputMap) {
        outputMap.add(out);
    }

    @Override
    public void initialize() {
        addComponent(age);
        addComponent(name);
        addComponent(ageOutput);
    }

    @Override
    public void execute() {
        // Do some tasks
    }

    @Override
    public void clean() {
        // Clean things when closing the plugin
    }
}

What does this code ?
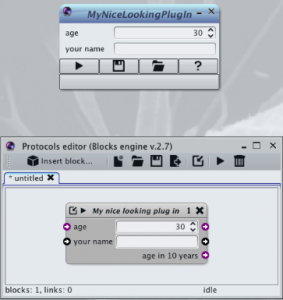
It renders a Protocol block where it uses two EzPlug component inputs of type integer and string where they also are declared as input of the block. The age input is also declared as an output of the block.